Introduction
With frontend development getting more and more complex every day, there are more and more steps we as frontend devs need to go through in order to get the job done. Of course there is still something to be said for crafting your HTML / CSS, but this isn't always required / possible.
Tools like Markdown and HAML can take the 'load' off writing raw HTML. Preprocessors such as SASS and LESS help abstract out CSS development and cater for things like vendor-prefixing (where appropriate). Javascript frameworks like JQuery and Backbone.JS help tackle complicated functionality. There are code linting tools to keep all our code conforming to style guides, such as JSHint and CSSLint. Finally of course we all use a sensible version control package to keep everything stored safely.
The problem with all of this is it adds another step, another command to run with each of these tools. A typical workflow would be something like this:
- Write your HTML (or Markdown / HAML) - Run HTML compiler
- Write your CSS (or LESS / SASS) - Run preprocessor compiler
- Write some Javascript (e.g. using RequireJS) - Run JS compiler
- Check all of your code - Run HTMLTidy, CSSLint, JSHint
- Browser test
- Commit your code (
git pushetc)
That's a lot of things to remember, seven in total. We haven't even included writing tests for the JS yet!
In the backend world, there are tools like ant, known as build systems, that allow DevOps to script all the tasks together. For a frontender though these tools often feel a bit overkill, not to say rather confusing!
Enter Grunt. It bills itself on its website as The JavaScript Task Runner
. Which is basically all it does. Run a set off commands, referred to as tasks. The killer thing here is, it's written in Javascript, which lowers the barrier to frontend dev. It also means you can write custom tasks easily. Let's see how we can use it to roll all of those commands in one simple step.
Installation
Grunt runs on top of NodeJS. For the purposes of this article it’s assumed you’ve already got NodeJS and NPM installed; there are plenty of guides around the web if you haven’t used node before. Provided you’ve got both Node and npm already installed, installing Grunt is simple:
npm install -g grunt-cli
(You might need to prefix this with ‘sudo’ on ‘Nix)
From then it’s just run at the Terminal with grunt. You can try running it on an existing project, although you’ll get a warning saying it can’t find a Gruntfile.
The Gruntfile
In order for Grunt to work it needs a configuration file, known as a Gruntfile. This contains general config, task definitions, etc. You set up targets here, e.g. to run different sets of tasks for different deployment environments.
Being a node project, a package.json file is needed too - this is where all plugins and dependencies are listed, as well and plugin info and project metadata (author, project URL, etc). We’ll start with a simple project, configured with JSHint and SASS tasks.
The package.json is quite basic, containing project name, version, etc as well as our dev dependencies (in this case Sass, JSHint and Grunt itself):
{
  “name” : “awesome-new-project”,
  “version” : “1.0.0”,
  “devDependencies” : {
    “grunt” : “~0.4.1”,
    “grunt-contrib-jshint” : “~0.6.3”,
    “grunt-contrib-sass” : “~0.5.0”,
    “grunt-contrib-watch” : “~0.5.3”
}
Note the tilde (~) before the version numbers: this tells grunt that it’s a minimum version number and any newer version is OK. To use a specific version of a plugin just leaving the tilde out.
We need to download our dependencies before we can use them; just go to the project root and run npm install and they’ll all be download.
Next we need to create our Gruntfile, where the magic happens. Here’s an example of what one looks like:
module.exports = function(grunt) {
    grunt.initConfig({
        jshint: {
            options: {
                curly: true,
                eqeqeq: true,
                eqnull: true,
                browser: true,
                globals: {
                    jQuery: true
                }
            },
            files: ['js/**/*.js']
        },
        sass: {
            dist: {
                options: {
                    style: 'compressed'
                },
                files: {
                    'css/base.css' : 'scss/base.scss'
                }
            },
            dev: {
                options: {
                    style: 'expanded'
                },
                files: {
                    'css/base.css' : 'scss/base.scss'
                }
            }
        },
        watch: {
            scripts: {
                files: ['**/*.js'],
                tasks: ['jshint']
            },
            css : {
                files: ['**/*.scss'],
                tasks: ['sass:dev']
            }
        }
    });

    // Load any plugins we need
    grunt.loadNpmTasks('grunt-contrib-jshint');
    grunt.loadNpmTasks('grunt-contrib-sass');
    grunt.loadNpmTasks('grunt-contrib-watch');

    // Set up any tasks here
    grunt.registerTask('default', ['jshint', 'sass:dist']);
    grunt.registerTask('dev', ['jshint', 'sass:dev']);
}
The three sections (jshint, sass, watch) are all task definitions, and set specific options for the tasks. Using the JSHint plugin as an example, we have an array options (these are changes to JSHint default settings that match our requirements). The files property lets the plugin know what to run against.
The Sass plugin is more complicated in that there are two ‘targets’ specified. This means we can set different options for different environments (like local dev for example). To run a specific target just call it like so: ‘sass:dev’. You can create as many targets as you want for a task.
Tasks are generally installed as plugins, and as such we need to load them explicitly otherwise Grunt won’t know about their existence. It’s easy to do though, using the grunt.loadNpmTasks method.
Before we can use anything, we need to specify a target. The target is just a list of the tasks we want to run. If you run grunt with no targets, it looks for the default task. This needs to be registered or Grunt won’t know what to run. We’ve set up our default task to run JSHint and Sass with the dist set of options (more below):
grunt.registerTask('default', ['jshint', 'sass:dist']);
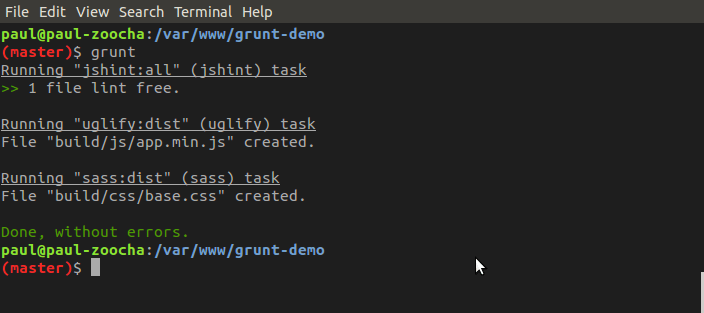
When we run grunt at the command line (with no arguments), it looks for the default target and runs that if it’s there. For our example, the output looks like this:

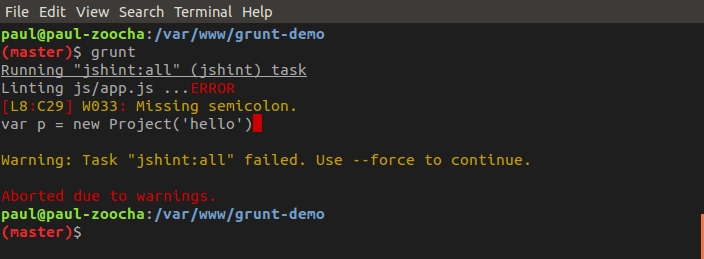
You can also run a specific task individually, for example grunt jshint . If we introduce an error into our JS we can see what happens when JSHint fails:

Plugins
One of the best bits about grunt is its plugin library. There are tons of plugins to run common tasks, such as JSHint and Sass (as included above). Head over to http://gruntjs.com/plugins for a comprehensive list. They can be added to your package.json file manually, or you can add them individually via npm, using the --save-dev switch to add it to the package.json file:
npm install grunt-contrib-watch --save-dev
Sass
Within the sass task there are two sets of options, dist and dev. With Grunt you can set up multiple sets of options, for example for dev / debugging or for production environments. The ‘dev’ task for Sass configures the compiled CSS to be expanded rather than minified.
To run the task with specific options we call it with the set after the colon, e.g. sass:dev.
Watch
The final section of the Gruntfile is for the grunt-contrib-watch plugin. This lets us keep an eye files and / or folders and automatically run tasks when their contents change. Inside are two subsections, scripts and css. They follow the same pattern: a set of files to watch, and a task to run. In the CSS instance, we’re running the dev target of the Sass task when any SCSS files change:
css : {
    files: ['**/*.scss'],
    tasks: ['sass:dev']
}
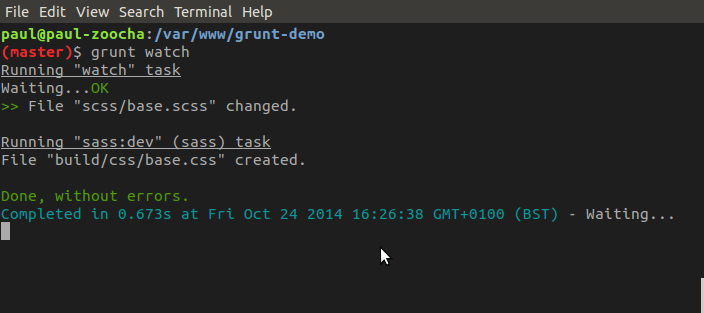
When we edit our Sass files now, Grunt registers this and recompiles them:

And that’s about it! We’ve uploaded the code from this example to https://github.com/zoocha/grunt-demo so feel free to grab it and have a play around. A lot of the time it’s easier to fully understand code by grabbing a copy of it, and playing around with to see what happens. Enjoy!

